Just been back from a holiday...and a tiring one!
So this post will be a quick update on a few items that was done before the holiday.
Well, i should have post this earlier but really didn't have the time and Big Ray was down with fever just a few days before our flight (oh gosh! that just got me panicking!!!)
Fortunately, she got well a day before our flight... =)
Okie, so here goes the list...
Fabric Belt
Make these fabric belt for Big Ray & Little Jay so that their jeans would stay put hehehe...
I would prefer toddlers to wear something with elastic and require no belts (easier for mommy to change their diaper) but since the weather is a bit cold i decided to let them have a few pair of jeans around.
Passport Holder
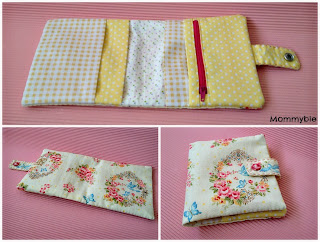
This is the first ever passport holder that i make with 4 slots and a little zipper pocket to keep some money & coins. All these while i've never use a passport holder but since i'm travelling with my 2 gals along, i'll need this to keep our passport together. I really loved the fabric and the out come of this holder but Silly Me, i miscalculate the seam allowances and MY PASSPORT COULD NOT FIT IN! Can you imagine how i felt then? ... =(
After spending the whole day with my mood turned to cloudy, i took out my stash of fabric and look for some materials to do a new one. And this time, i'll make sure i get the right measurement. And so this was it, my passport holder.
It was a combination of yellow & grey colour. I think this was lovely too and the most important thing is - it fits the Passport. ^^ (I did not iron it beforehand hehe... so it looks so wrinkly)
Luggage Tag
Tadaa... aren't these luggage tags cute? I saw lots of fabric luggage tags tutorials on the web but i wanted something cute and bright so i ended up with these. I used felt for all of them except for the red matryoshka doll which i added a fabric as the dress ( it's pretty easy, just wrap a piece of fabric around the felt with fabric glue and sew them together). The transparent slot is actually book wrapper - i bought the thicker plastic type from Popular Bookstore. Big Ray loves the Hello Kitty one. I actually put some poly fiber fill in the hello kitty one but the result is not as good as the flats one because the slots behind seems like 'puff up' if you notice from the picture below.
No-Knit Scarf
This was actually from a tutorial i found from Martha Stewart Crafts website. If you are interested, you can find the tutorial here. As i don't know how to knit, this was the next best thing to do. I think i can handle knots much better than knitting and i love the outcome of it ^^ .
I bought a ball of yarn from Daiso. Well, i did not follow the exact measurement because i don't have enough yarn so i basically divide them accordingly. Lucky me, it suits a toddler just nice.
And for the process of tying the knots, i hung up the yarn instead of laying them down which i find easier. (hehe... those hangers are really old stuffs) The first few knots got me thinking if i'm doing the right thing but trust your instinct, you'll get the hang of it after a while.
Thermometer Pouch
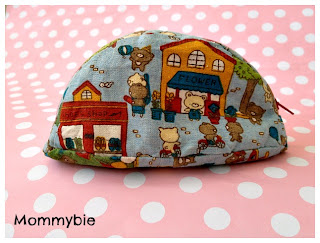
I always carry a thermometer whenever my gals are going for balik kampung or any trips which required more than 1 day. The original pouch was spoilt - the zipper came off so i cut the pieces up and make one my own.
Notice the zipper part which was torn? It actually have me cracking up my head a bit sewing this pouch because of the curves and again i did not allocate enough seam allowances. Thus the pouch was a bit out of shape i guess...but fortunately, the thermometer still managed to squeeze in! Whew!
That's the front view in the picture above and the inside lining (picture below). I think i'll do this again sometime in the future - and to get the right measurement.
Well, that's all for this post. Next , i'll be posting about our holiday trip to China. See ya ! ^^


